Your HQ Settings control your Upserve POS features and allows you to customize your POS to fit the needs of your business.
Role Permission to Edit Settings
Point of Sale (General) Settings
Other HQ Settings
Role Permission to Edit Settings
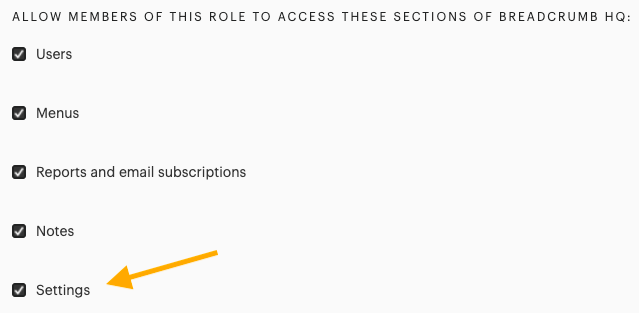
Users assigned to the the Upserve POS Admin role and an email/password login for HQ can view and edit HQ Settings.
If other POS Roles need to be able edit HQ Settings, you will need to turn on the 'HQ Access > Settings' permission for the role. Each employee that needs to view/edit HQ Settings will also need an email address added to their user profile, so they can create an HQ login password.
To learn how to edit an Upserve POS Role, click here. To learn how to add a Upserve POS user, click here.
Point of Sale (General) Settings
- Log in to HQ
- Click Settings on the left navigation bar
- Click Point of Sale to open your Upserve POS General Settings
- Customize your settings (See overview of each setting below)
- Click SAVE after you change you settings
Venue & Address
When you click on
Settings > Point of Sale, the top of the page will show your
restaurant's Name and Address.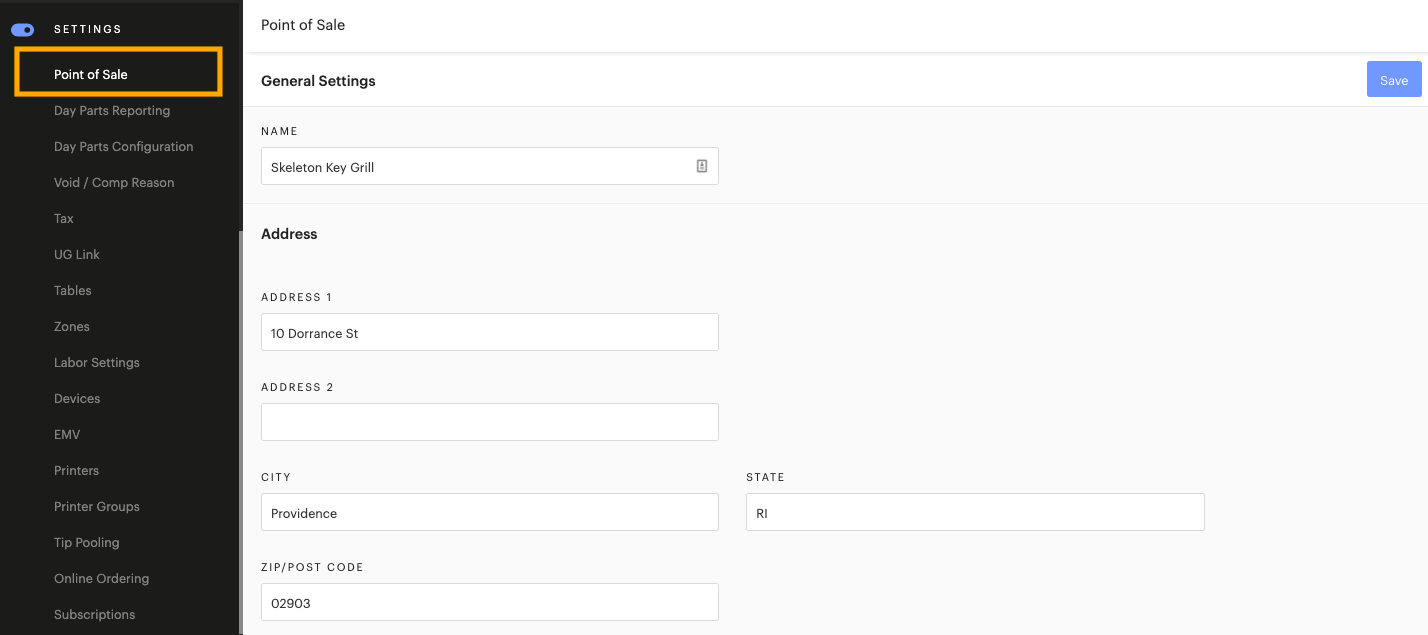
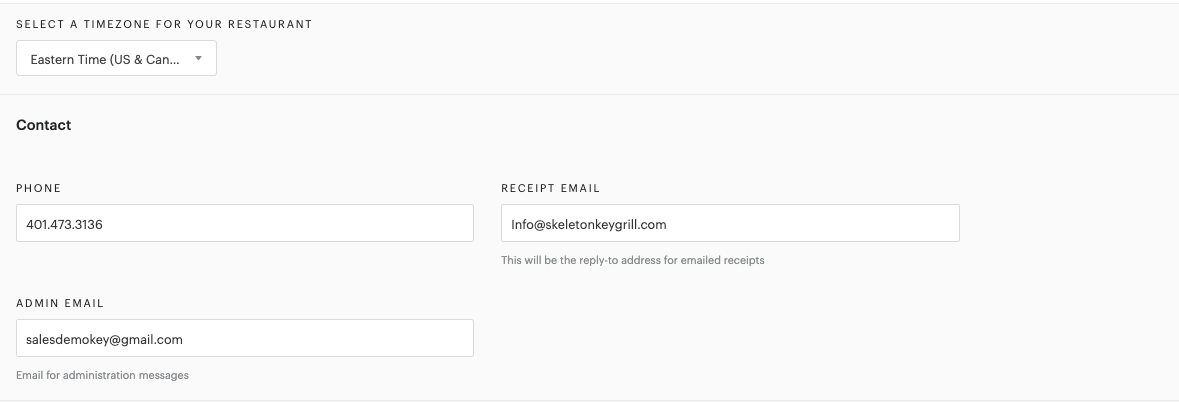
Time Zone & Contact Information
Below your restaurant's Address will be your preferred Time Zone and Contact information.
Click on the Time Zone bar to change your time zone (if needed).
Click on any of the fields in the Contact section to update your contact information.
Receipt Email: If you
email receipts to guests, this will be the reply email address for emailed receipts.
Admin Email: This email address receives Upserve emails. It is important that this email address stays up to date with the best contact email address for the business.
The Admin Email also receives the Upserve POS 'End of Day Summary' when you turn on this email subscription. Want to learn more about email subscriptions? Click here.
Trading Day
Your Upserve POS trading day is the
span of hours your restaurant operates, creates checks and takes payments. When the trading day ends, the Upserve POS automatically sends your credit card batch for that day's service to be captured. Employees that did not clock-out before the trading day ends will be automatically clocked-out. Checks that are left open on the Upserve POS will also auto-closed at the end of the trading day.
Your trading is configured during Onboarding to end at a specific time of your choosing. The trading day is meant to end when there are no more staff members working in your restaurant and all checks have been closed.
| Note: If your restaurant hours have changed or your trading day is ending at an inconvenient time, contact Upserve Support to help you change your trading day end time. Click on the chat icon at the bottom right of this page to begin a chat with one of our Support agents! |
To learn more about 'Trading Days,' click here.
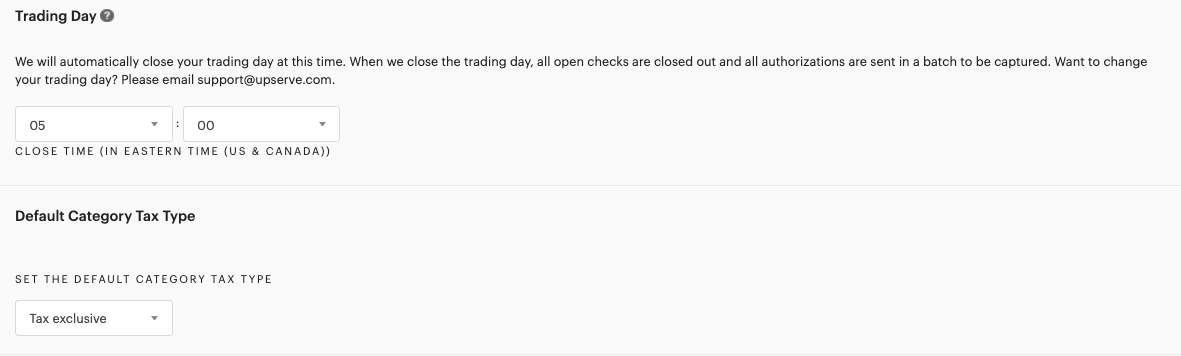
Default Category Tax Type
The 'Default Category Tax Type' can be set to tax inclusive or tax exclusive. When you create a new
Menu Category, the category tax type will auto-fill with the default setting selected in this
HQ Settings section
(Ex: If you select 'Tax Exclusive' as the default tax type, all new categories you create will default to the 'Tax Exclusive' setting. You will still be able to change the tax setting manually from the category page, if needed.)Tax Inclusive: the item prices includes tax
Tax Exclusive: the item price excludes tax
(item price and item tax will appear separately on checks)To learn more about tax settings, click here.
To learn more about menu categories, click here.
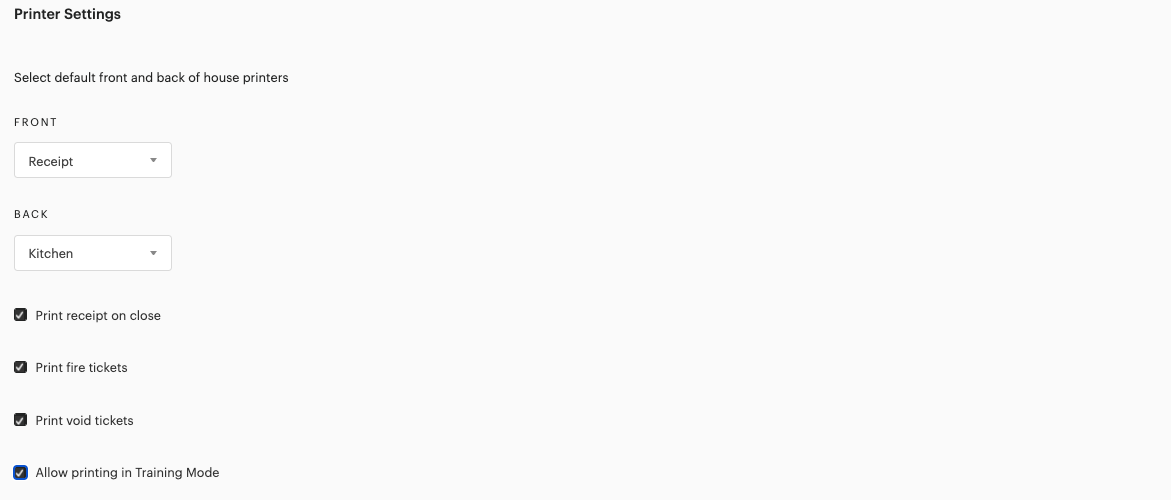
Printer Settings
If a printer is offline or missing, it cannot print from the Upserve POS. To ensure that no chits or receipts are lost, you will need to select your preferred default (backup) front of house and back of house printer groups.
In the 'Printer Settings' section, click on the FRONT and BACK boxes to select your preferred default front and back printer groups.
FRONT: will be where receipts print when a receipt printer is offline or missing
BACK: will be where chits print when a Kitchen, Bar or other preparation station printer is offline or missing.
| Note: The above feature is only supported on V2 terminals at this time. Default FRONT and BACK printers are not currently available for V3 terminals. |
After you select your default front/back of the house printers, you will see a list of general print settings that you can turn on or off. Check off any setting you wish to use.
Print Receipt on Close: when this setting is checked, a receipt will print for every check when the check is closed. When it’s unchecked, receipts will only print for credit card and “other tender” type of payments.
Print Fire Tickets: when this setting is checked, a FIRE ticket will print when a course is fired from the check, alerting the kitchen or other prep station that they need to begin preparing the course.
Print Void Tickets: when this setting is checked, a VOID ticket will print to the item's printer if an item is voided or removed from the check. This alerts the staff at that printer prep station that the item should not be prepared.
Allow Printing in Training Mode: when this setting is checked, staff members can print practice receipts and chits from Training Mode.
Tax on Receipt & Product Mix
Itemize All Taxes on Receipt: when this setting is checked, receipts will display the tax applied to each item instead of just a tax total on the bottom of the receipt. Tax on Product Mix: when this setting is checked, itemized taxes will appear on the Product Mix CSV file. When you view the Product Mix report, click '
Download' to download the CSV file.
To learn more about the 'Product Mix Report,' click here. 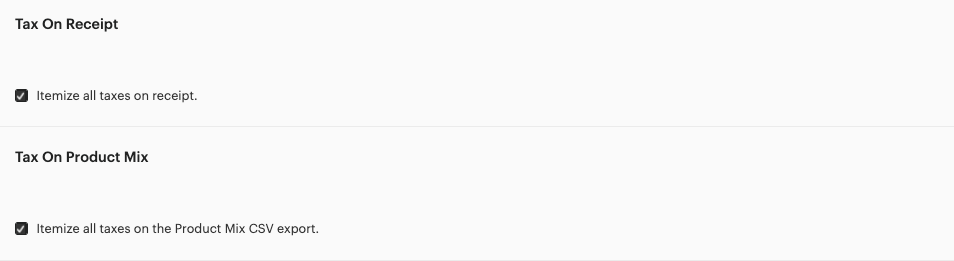
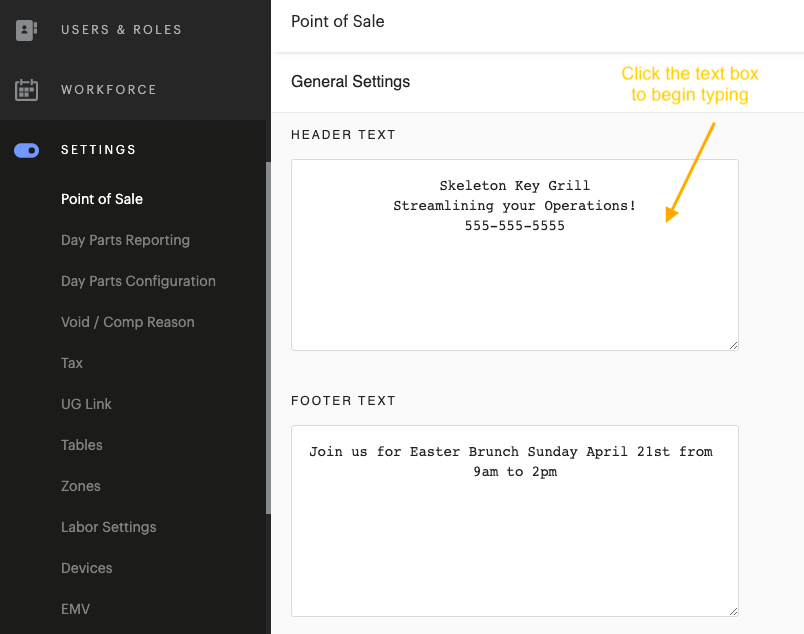
Receipt Design
Receipt Design: Enter you restaurant's name, address, and/or special messages at the top and bottom of the customer receipt.
Click in the 'Header Text' and 'Footer Text' boxes to edit your receipt header and footer. Remember to click SAVE after making any changes in HQ.
| Note: You can enter any text you like in the Header and Footer section, but you should refrain from putting any personal information, such as a Manager's phone number. The Header/Footer text will print on all customer receipts. |
Suggested Tips
Suggested Tips: if you turn on this setting, you will be able to enter a suggested tip amount for customers
(Ex: 15%, 20%, 25%) and the Upserve POS will automatically calculate the suggested tip totals based on the check balance.
The suggested tip will print on receipts and display on the signature screen for Upserve POS and Tableside devices.To learn more about suggested tips and other tip settings, click here.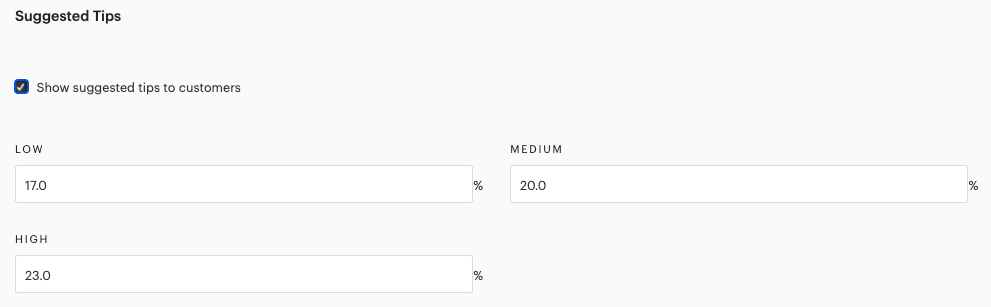
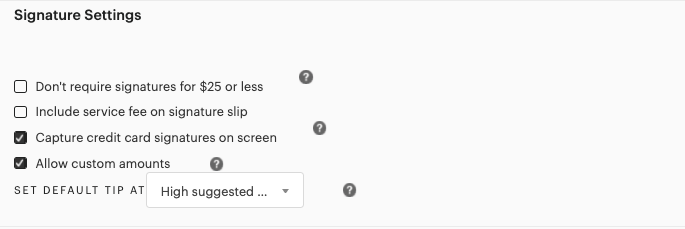
Signature Settings
Turn on signature settings to customize your receipt printing and turn on 'capture credit card signatures on screen' to allow guests to sign for credit card payments on your Upserve POS terminals or Tableside devices.
To learn more about 'Sign on Screen' and 'Custom/Default Tip' amounts, click here.To learn about 'Service Fees', click here.
Automatic Gratuity
Turn on automatic gratuity to
apply gratuity to large group checks. Once this setting is turned on, Admins/Managers can also manually add gratuity to checks, as needed.
To learn more about using 'Automatic Gratuity' and 'Automatic Gratuity Reporting', click here.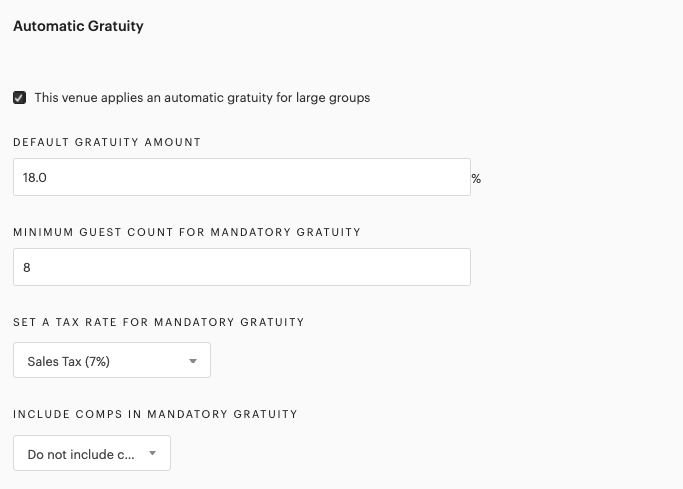
Non-Cash Tips
Non-Cash Tips Paid Out in Cash: Check this box if you want credit card and other tender tips to be paid out in cash to employees at the end of their shifts. When this setting is turned on, credit card/other tender tips will be deducted from cash owed calculation on the Checkout Report.
Automatic Gratuities Paid Out in Cash: Check this box if you want automatic gratuities to be paid out in cash to employees at the end of their shifts. When this setting is turned on, automatic gratuities will be deducted from cash owed calculation on the Checkout Report.
To learn more about 'Checkout Reports' and 'Cash Owed Reporting', click here.Tip Withheld: some restaurants withhold a small percentage of employees' tips to cover credit card processing costs or other expenses, like family meal. If this is a feature you would like to use, check this box and enter the percent you would like withheld from employees' tips.
To learn more about 'Tip Settings', click here.
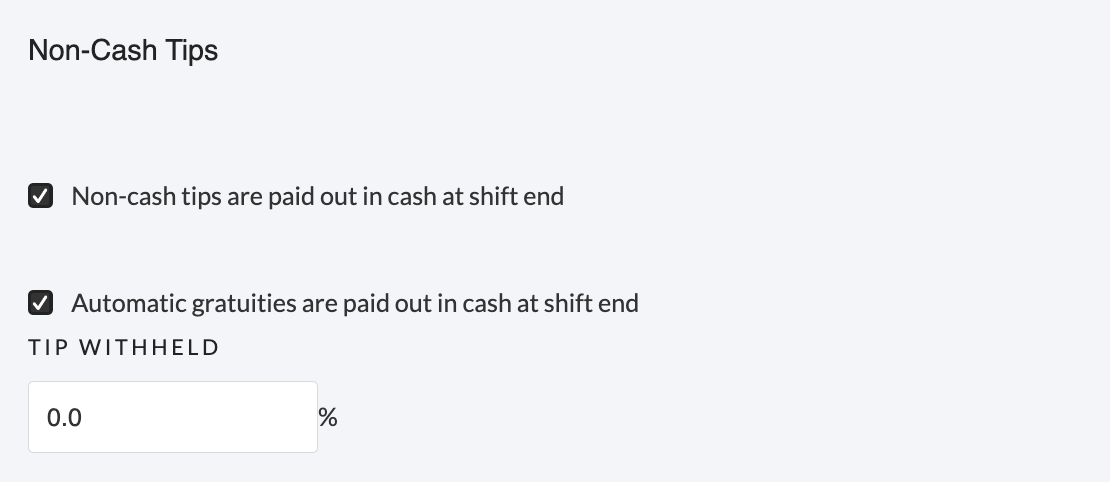
Table & Tab Settings
Table Settings: check the
'Ask for guest count' setting if you would like your staff to enter the guest count when they start a new
Table check. Entering a guest count is important for tracking your total covers week over week.
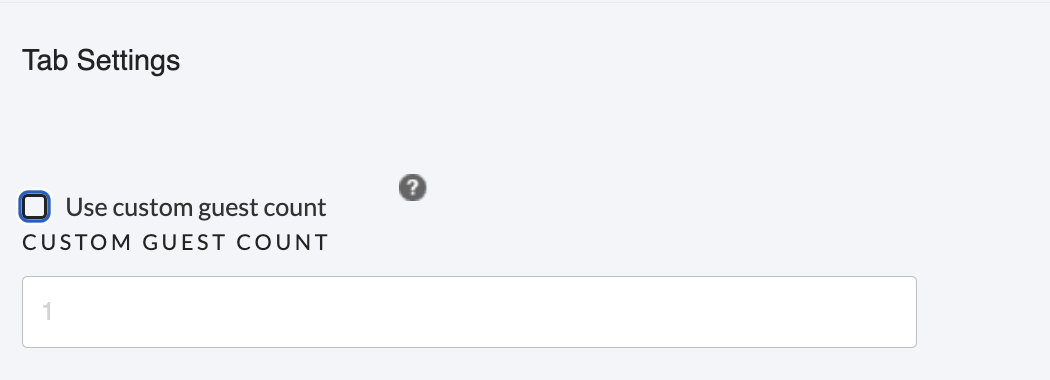
Tab Settings: Lightspeed Restaurant U-Series V3 will default to
one guest for Tab checks.
If you are running versions 3.11.3 and lower, this will be one guest on every tab check.
If you are running versions 3.11.5-3.11.8 this will be one guest by default for tab checks, but if changed on the terminal level, will remain whatever number it was changed to for every tab check made on that terminal until changed again.
In
version 3.11.9 and higher we made this more customizable by enabling the user to set it in HQ. Under
Tab Settings the default guest count for Tab checks will be set to 1. If you wish to change this, check
"Use custom guest count" and enter the number of guests you wish all tab checks to report as. Save this setting so that all tab checks will default to this count going forward.
Due to these differences, make sure all your V3 devices are on the
latest version to ensure all terminals are behaving the same. A mix in version numbers will result in the terminals behaving differently based on the functionality listed above. If you are on 3.11.9 or higher and can not use this checkbox in HQ please reach out to support.,
To learn more about Upserve POS Reporting, click here.
To learn more about Upserve Analytics Reporting, click here.
Delivery, Takeout & Pre-Auth Tabs
Delivery: check this setting if you restaurant offers delivery services. Turning on this setting will allow you to create
Delivery Checks on the Upserve POS, so that your staff can take delivery orders over the phone.
Take Out: check this setting if you restaurant offers 'take out' services. Turning on this setting will allow you to create
To Go Checks on the Upserve POS, so that your staff can accept 'take out' or 'to go' orders over the phone.
| Note: If you want to accept Online Orders, you can also use Upserve Online Ordering, so that online take-out and delivery orders are sent directly to your Upserve POS! To learn how to set up and use Upserve Online Ordering, click here. |
Pre-Auth Tabs: turn on this setting if you would like your staff to be able to pre-authorize credit cards when starting a tab.
To learn about 'Pre-Authorizing Credit Cards' on the Upserve POS and Tableside click here.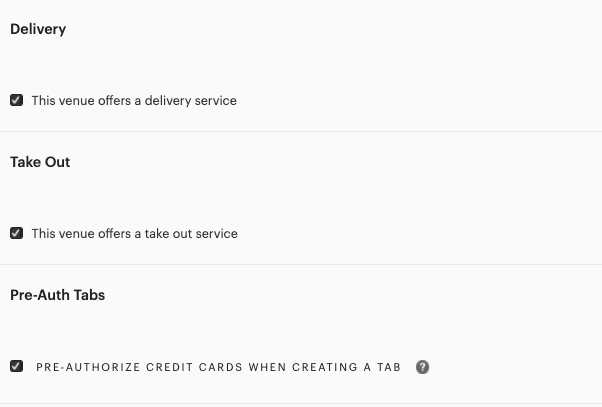
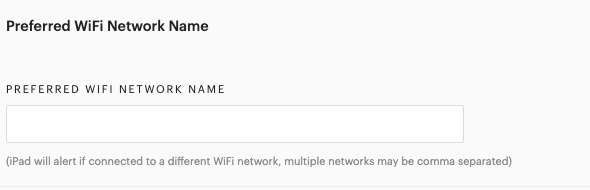
Preferred WiFi Network Name
In this section, you can enter your
Upserve POS network name if you would like your terminal to alert you when you are connected to the wrong network. If you Upserve POS is not connected to your POS Network, your printers will not be able to communicate with the Upserve POS.
Entering a preferred WiFi Network can be helpful for restaurants that have a POS, Office and Guest network, and want to ensure that the Upserve POS is not connected to the Office or Guest network by mistake.
| Note: This setting is helpful for wireless iPad terminals, since staff members can easily navigate to iPad Settings to connect to a different network than the POS Network. |
Other HQ Settings
In the HQ Settings section, there are a number of other settings that you can customize for you Upserve POS. Click the links below to learn about these other HQ Settings:
Day Parts Reporting & Configuration
Customize your Day Part reporting in this section. See
Day Parts Overview
Void/Comp Reasons
Edit and create Void/Comp Reasons in this section. See How to Create & Edit Void/Comp Reasons.
Tax
Set up your tax rates in this section and customize you inclusive/exclusive tax tracking settings. See Tax Settings Overview.
| Note: Upserve customers are responsible to setting up and applying tax rates to items. If you are unsure what tax rates to set up and apply, consult a tax expert and get the help you need before selling items. |
Tables & Zones
Create Tables and Zones for your Upserve POS floor plan in these sections. See
Floor Plan Management - Add and Change Tables.
Labor Settings
In this section, customize your break and overtime settings based on the needs for your business. See HQ Labor Settings: Enable Break & Overtime Tracking.
Devices
In 'Devices', you will be able to view Upserve POS terminals and Tableside Devices that have been logged in to your restaurant. On the far left hand side of this list you will see the name of the terminal. On the far right hand side of the list you will see when the specific terminal was 'Last Active', meaning the last time Upserve saw this device as online.
After 7 days if a device has not been registered as online it will move from the 'Active Devices' list to the 'Inactive Devices' list. If you have devices in the 'Inactive Devices' list, best practice is to remove them by clicking the red circle next to the 'Last Active' timestamp. This ensures your device data is most accurately reflected should you reach out to Support and gives you an understanding of which terminals are currently being used.
If you have any `Active Devices` running the V2 application (Breadcrumb 2.19.1), upgrade them to Lightspeed Restaurant U-Series V3 as soon as possible.
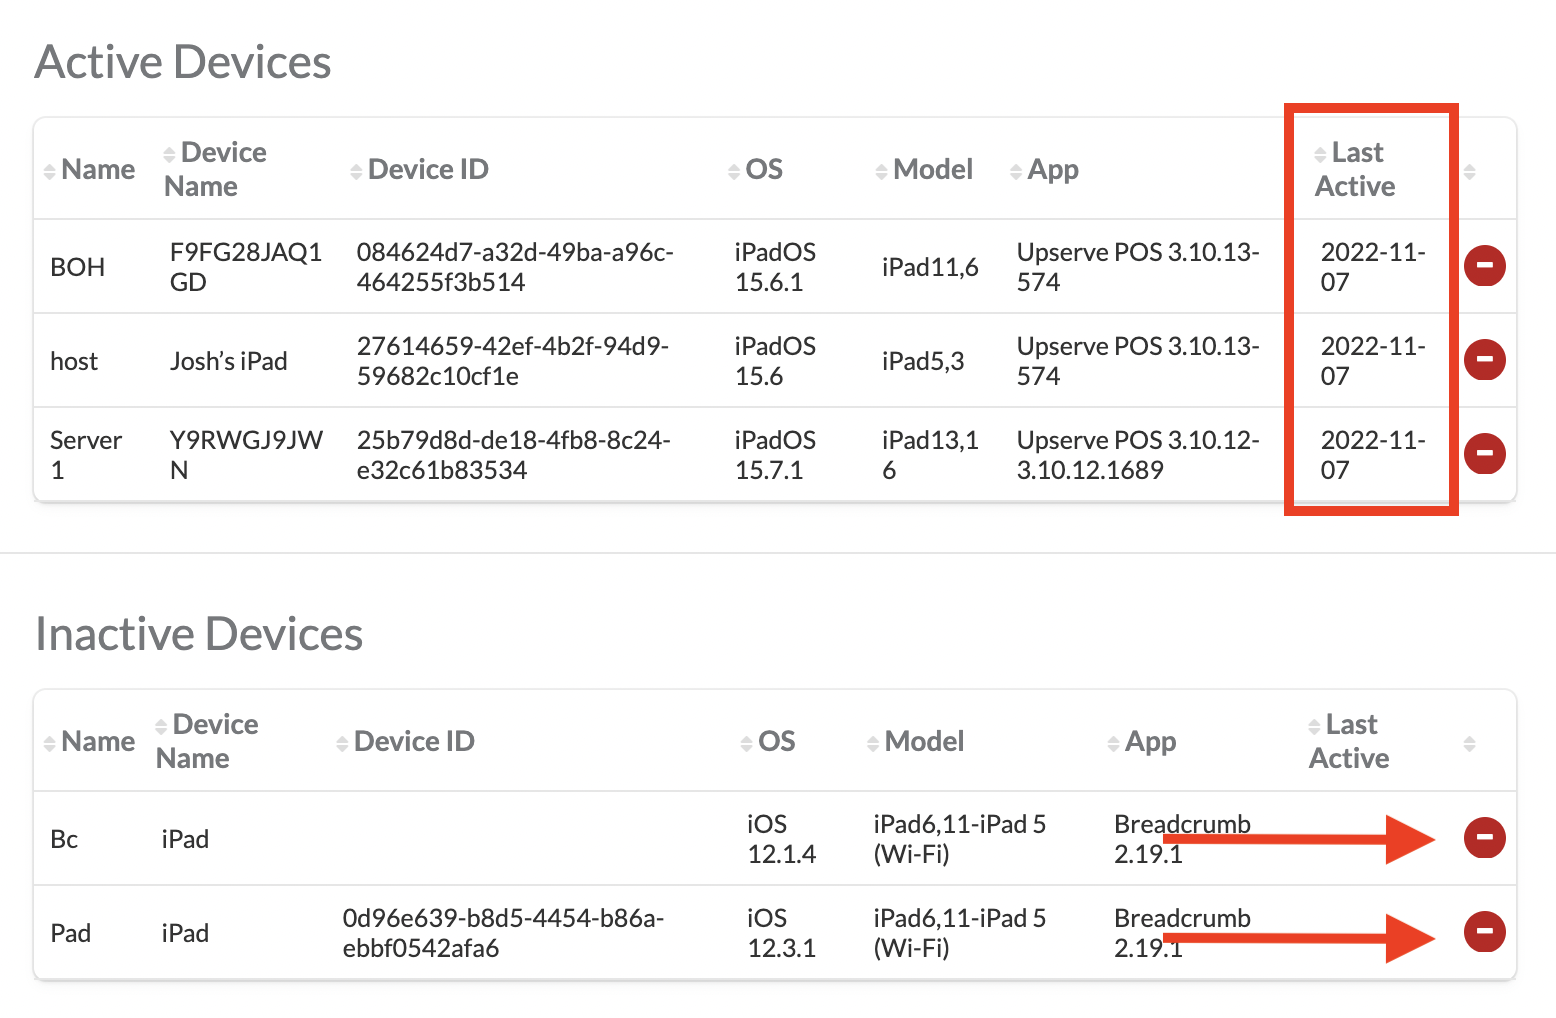
Be cautious removing any devices in the 'Active Devices' list as it will deactivate that terminal and return it to login screen.
EMV
In EMV, you will be able to view your connected EMV Readers and to which terminal they are connected.
Printers & Printer Groups
In these sections, you will set up your 'Printers' to connect with your Upserve POS and will set up 'Printer Groups' for receipt and chit routing. See
Printing Overview.
Tip Pooling
If you would like to use 'Tip Pooling' in your restaurant, you can turn on and customize your tip pooling settings in this section. See How to Set Up Tip Pooling.
Online Ordering
Turn on and manage Online Ordering in this section. See Upserve Online Ordering Overview.
To learn how to set up online ordering through Grubhub and Chowly, visit these articles:
Online Ordering with Grubhub
Chowly Onboarding on Upserve POS
Subscriptions
In this section, you can subscribe to the Upserve POS
'End of Day Summary' email and/or subscribe to individual Upserve POS report emails. See
Upserve POS Report Email Subscriptions.
Tender Management
Create and edit Other Tenders in this section. A number of 'Other Tender' types will exist in this section when your Upserve account is created (Ex: Deposit, Voucher, Other). See Add, Archive & Reorder Other Tenders in HQ
Loyalty Configuration
Manage and customize your Upserve Loyalty program in this section. To learn how to sign up and use Upserve Loyalty, visit Upserve Loyalty Rewards Program Overview.
Integrations
Upserve partners with a number of integration technology partners, like Roaam, Resy, and Gusto! Use this section to connect supported integrations with the Upserve POS. See Set Up an API Connection with an Integration Partner.